Most people sort of abuse this wonderful tool. Gelli print plate is a special printing base with soft, rubber like surface that is easy to ink and easy to make imprints on. It is especially amazing with the "ghost prints", the second print after some ink or paint is removed. It is amazing how well it reproduces fine lines and texture, like that on plants or textiles.
You can make your own, follor the video above, or buy a ready-made one. The printing works the same way, the difference is that the store-bought version is more durable and not as easy to damage, but if you damage the home-made version, you just melt it and remold it.
Most people just "play" with it, with no - or not much - planning they just throw colors on, spread them and put on stencils and masks and make abstract papers - and that's just fine, too. Some of the papers created like this are amazing!
But let's go through the dos and donts.
- you will be producing quite a lot in relatively short amount of time, so see that you have place to dry your prints without them touching anything.
- have quite a lot of space around the gelli plate so that you can move papers and stencils and masks and what ever you are using.
- you need to keep the gelli plate stationed on non porous surface, like plastic, glas, china, metal - cutting boards, trays and baking plates work fine. Otherwise the gelli plate will suck itself stuck to the surface. Do not place it on paper.
- you also need to keep the surface of the gelli plate above the immediate surface around it. Keep at least a hand's width free all around the plate.
- the best paper is thin paper. Some say "use cardstock"... I use printer paper, because that is what I have ample access to, but I would use tissue paper or rice paper if I had easy access to that. I still haven't found a place that sells tissue paper in bulk.
- get a brayer. Get a good quality rubber brayer with smooth roll that rolls smoothly :-D
- You will need a junk paper to clean the brayer on between the layers.
I use baby wipes to wipe it properly clean between layers, because I have noticed that some times the paint will stuck in clumps on the brayer, and these will leave marks in your prints.
- Don't open your paint bottles above the plate. Tiny flecks of paint might fall on the plate and create havoc later.
- It will get messy, so see that you have protected the working surface. It's good to use a newspaper or something like that under the surface you have the gelli plate on, so that you can clean your tools.
- It is good to have some kitchen paper and water spray bottle (you can have a little soap in the water, if you want to, but you don't need to) so that you can clean the plate every now and then.
You also need some tissue paper to lift up the extra paint, so that you won't waste it :-D All this paper becomes new decorated paper that you can use in your art journal.
- You don't need to use the size of paper your gelli plate is. You can print large papers in sections, use the gelli plate as a stamp, or print small pieces of paper, like tags or cards, on big gelli plate.
You also don't need to use the whole surface of the gelli plate.
- you can use a retarder with your acrylics to keep the paint wet longer, but if you notice your design has dried too much, let it dry all together, put a new, fresh layer of paint on top and it's possible the fresh paint will lift the dry paint from the gelli plate.
It doesn't take more than 10-15 minutes for the paint to dry.
- Have some plan before you start.
Collect the tools and materials you plan on using.
- any water based medium is fine. Most use acrylics, but I have used watercolors too, and those work fine as well. Someone said that ink colors the gelli plate. I don't know. It's ok, though, except for the esthethic impact. It won't dye the papers you are going to print.- don't drown the plate in color. It's better to use too little than too much paint, because the paint will smudge the print if you have a lot. About 1 teaspoon is good. Three blobs of the size of your fingertip.
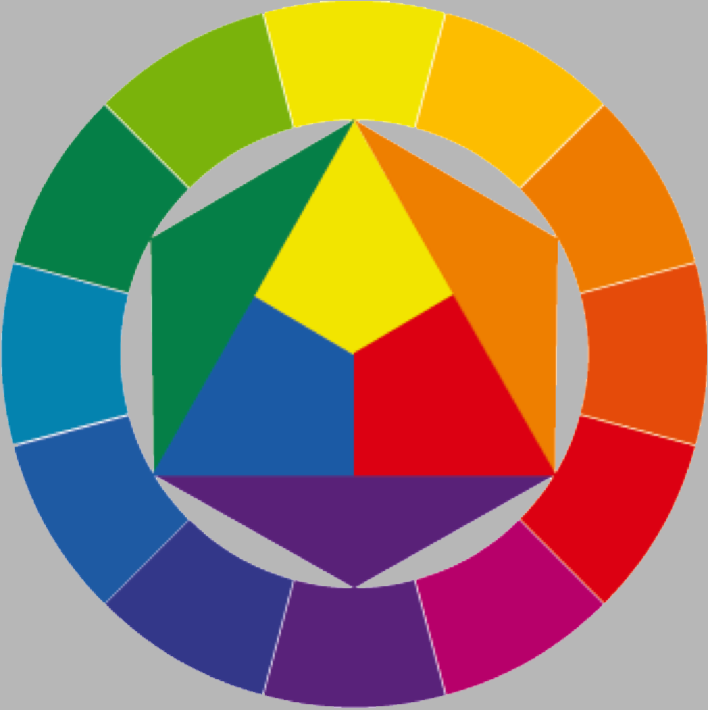
- The more colors you use, the more probable it is that you produce "mud". When you mix all the colors of the rainbow, you get nasty brownish grey color. Use only one color at a time; colors next to each other on the color wheel or colors with white and/or black. For example; blue-green-purple is OK, blue-purple-red, red-orange-yellow; yellow-green-blue, green-blue-turquoise - green and purple without the blue in between starts to create mud.
Now, if you like the vivid and energetic impact of opposite colors, you need to let the first layer of one color dry and then print on the other color. Just be aware of that if you use transparent color - and most acrylic hobby paints are translucent - you will get sort of mud effect on places where the top color layer is thin. You could use masks and leave parts of the paper white when first printing, and then printing the second printing on those white parts. People who are used to printing are pretty good at placing the paper on the plate so that it falls about the same spot, and there are some tricks to this, too, but I would make the first print, let the paper dry and then mask - on the paper - the colored parts, either with paper (mask/stencil) or masking tape - and printing the second time this masked paper, to be sure I get the paint where I want it.
It's nevertheless best, if you make your papers and then collage them together, to keep the colors bright and clean.
note what kind of color combinations you like. Do you like clear patterns? Then you should use a light and a dark color.
If you like more batik kind of patterns, then you should use colors that are close to each other in value. But if you print light blue on light blue, grey or purple, you won't see much anything. But that might be an effect in itself. Experiment.
Also, start collecting color combinations you like.
- gelli plate is created to be an easy and quick way of adding color, so it is designed to be used with stencils, masks, stamps, combs etc. It's a bit like a combination of linoprinting and paste paper.
I like paste paper...
Don't mix patterns a lot. Don't put a strong pattern on a strong pattern, you'll end up with a chaotic mess. And a weak pattern on a weak pattern will create a weak blah mess. :-D
Strong pattern on weak pattern creates a nice batik kind of effect, weak pattern on strong pattern gives nice texture.
You can use any stencil when printing with gelli plate, but if you use the stencil as mask (let it lay on the gelli plate as you print) it should be very thin and have big, clear, open holes.
If you want to use an intrigate stencil, you use it as a stamp and push it on the paint and remove before printing, like when using the bubble wrap.
The best way to get in the mood is to watch all the videos by Gelli Arts. They have plenty of instruction videos on how to use their product, and they give you a lot of ideas and tips.
No comments:
Post a Comment